Rules Management Interface
Contents
Entering the Rules Management Interface
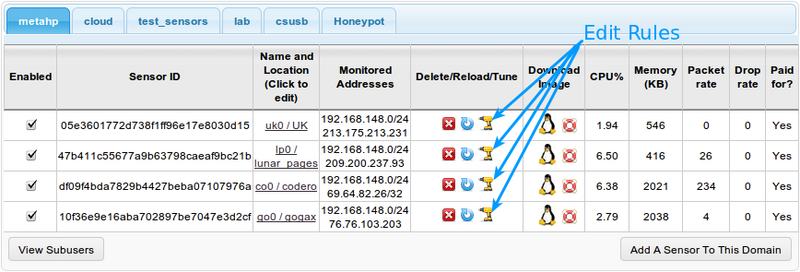
From the View Sensors page, the user can select the Edit Rules link to enter the Rules Management Interface.
One can also navigate to the Rules Management Interface from the Main Menu link:
Selecting a Sensor
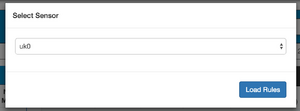
Upon selecting the Rules Management Interface, the user will be prompted to select a sensor.
Select a sensor from the drop down menu and then click the Load Rules button.
From there, the user will be able to manage the rulesets on a sensor-by-sensor basis.
Sensor Rules Controls
After selecting a sensor, the user will have the option to modify properties of the rulesets, and issue commands to the sensors with the tools on the menu bar.
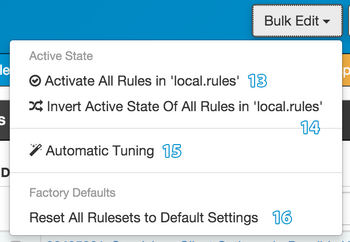
- Bulk Edit Menu - This menu has options that can be used to modify multiple rules at the same time.
- Sensors - Clicking on this button will open the Select Sensor view from the Selecting a Sensor section above.
- Upload Rules - Import custom rules from a local file on the user’s machine to the selected sensor's local.rules file.
- Get Updates - Get the latest rules from Emerging Threats and Sourcefire. Note that if a user performs local modifications by disabling a rule or modifying a rule, this update process will leave the modification intact. The action may take a few minutes.
- Reload Sensor - Prompt the sensor to reload the sensor configuration, which includes rule files and options.
- Search Rules - The user can specify search terms to find rules by IDS signature or keywords from the rule content.
- Display Full Rules - Use this to toggle between displaying only IDS signature ID and message or full rule content.
- Records Per Page - The Default Rules List view displays 25 records per page. Use this option to switch to displaying 10, 25, 50, or 100 rules per page.
- Show All IPS Rules - Filter all rules files for rules where Drop is enabled.
- Performance - Open Snort Rule Performance page.
- Revert Changes - This option will only appear when there are modifications to the selected sensor's rules. Click this button to revert all changes since the last save.
- Save Changes - This option will only appear when there are modifications to the selected sensor's rules. Click this button to save all changes since the last save.
- (Bulk Edit) Activate All Rules in... - This offers quick access to enable all rules in the currently selected ruleset.
- (Bulk Edit) Invert Active State Of All Rules in... - This offers quick access to invert the Active state of all rules in the currently selected ruleset.
- (Bulk Edit) Automatic Tuning - This starts automatic tuning. See "Automatic Rule Tuning" below for more information.
- (Bulk Edit) Reset All Rulesets to Default Settings - Resets the rules to the default configuration.
In order for the changes made in the rules interface to take effect, commit the changes using the save button as shown in figure 5 (note that the Save/Cancel options only appear if the rules have been modified). After selecting the save option, a window will appear indicating that the changes are being verified. This process ensures that there are no issues with any changes that were made to the rulesets and that the sensor will correctly load the rules. Once the Save process finished, the user will be prompted to reload the sensor.
Updating The Rule Files
To update the rule files, click the Get Updates button on the Snort Rules Controls (see above). Most of the sensor controls buttons will be disabled/greyed out, and the Get Updates button will have a spinner icon until the update process finishes:
Next, the page will be updated to indicate if the updates were applied successfully. After the Get Updates process completes, save the changes and reload the sensor configuration for the changes to take effect.
Rule File List
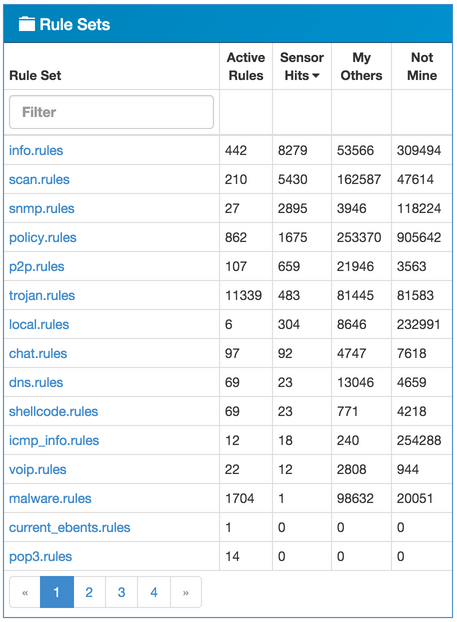
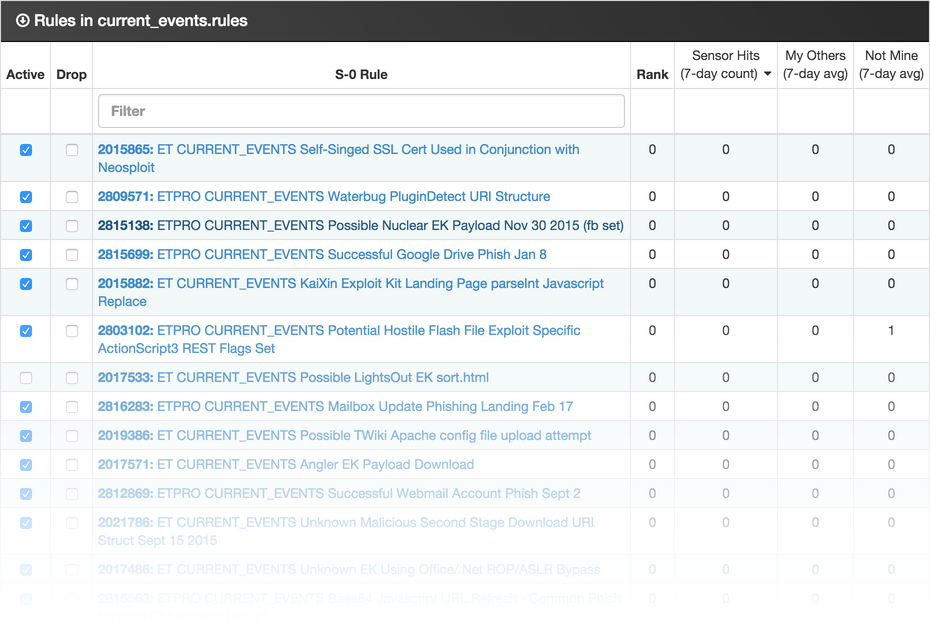
This portion of the interface displays a complete listing of all the rulesets in the sensor configuration. The local.rules file contains the pass rules (if any) that have been generated using the Tune IDS feature and any rules that were uploaded by the user.
- The numerical listing next to each rule file lists only the rules that are marked active within the set, not the total count of rules per set.
- By clicking on a ruleset title on the left, the Rules List on the right side of the window will populate with all the rules within that ruleset.
Rule Lists
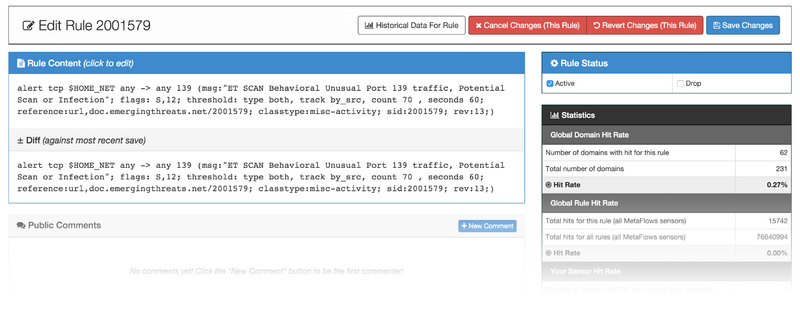
Each rule can be enabled or disabled by clicking on the checkbox under the "Active" column next to each rule. If the checkbox under the "Drop" column next to a rule is checked, the sensor will drop flows that trigger the rule. Although we do not recommend it, each specific rule can also be edited by clicking on the rule itself. This will open the Rule Editor window shown in Figure 14.
Manual Rule Editor and Rule Info
We do not recommend it, but the user can use the Rule Editor to make changes to the content of individual rules. When modifications are made, the "Diff" section will show changes to a rule since the most recent save of the rulesets. Statistics for the rule are displayed on the right side of the editor, underneath the Active/Drop option checkboxes.
- Save Changes (This Rule) - Save any changes to the rule. After the rule is saved, the user will be returned to the Rule Management interface. The rule changes will not be stored until the save action is selected from the rule management interface.
- Revert Changes (This Rule) - Restore the rule to the last saved change.
- Cancel Changes (This Rule) - Cancel any changes to this rule. If the user hads previously made changes and saved a rule, those changes will not be affected.
- Historical Data For Rule - This shows event records from the specified SID for analysis.
- Checkbox: Active - This turns the rule on if checked, or off if unchecked.
- Checkbox: Drop - Change the rule's action to drop if the sensor is deployed as an inline IPS. If the sensor is not deployed as an inline IPS, this will create a block classification for the rule using the isolate plugin.
- New Comment - Click this button to make a comment on this rule. The comment will be visible to all other users who view a rule with the same alert ID.
Pass Rules
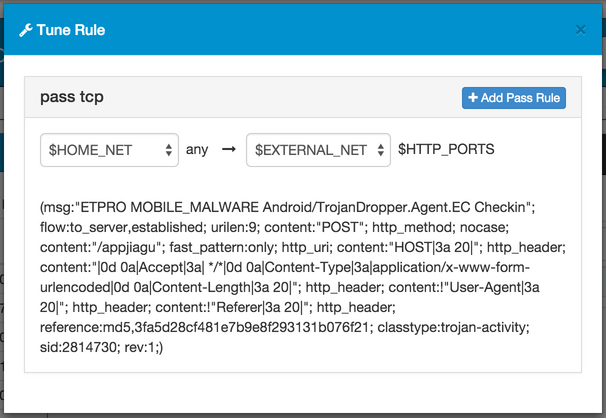
Pass Rules inform the IDS system that packet matching these rules should not generate alerts. Pass Rules are helpful for eliminating false positives without having to disable the offending rule altogether. The Pass Rules have system-generated SIDs so that they do not conflict with the original rules that to which they refer.
Tuning a Rule
The user can utilize the tuning interface to add pass rules to the local.rules file. Remember to save any changes to the rulesets via the Rules Management Interface.
Automatic Rule Tuning
For users that want to run a reduced ruleset for performance reasons, there is an Automatic Tuning option under the Bulk Edit menu.
This option will disable rules that are unlikely to trigger based on our observations across all customer networks. A rule is disabled if all of the following conditions are met:
- The rule has been active for more than 7 days
- The rule does not set a flowbit with the noalert parameter which another rule may depend on
- Fewer than 3 users have the rule active OR no alerts on the rule have triggered in the last 7 days across all MetaFlows Sensors.
After clicking on the Automatic Tuning option, the changes will be merged with any prior changes the user has made, meaning that rules the user has specifically enabled will stay enabled. If the user wants to revert to a default minimal set, consider first using the Rules Defaults option.
Once the Automatic Tuning has processed the rules, it will then automatically fetch the latest updates and disable all of the appropriate rules.
To complete this process, the user will need to click Save so that the changes are committed.
Adding Local Rules
This section assumes the user has one or more snort rules that the user has created or found from a third party source.
An example Snort Rule that we may wish to add is as follows:
alert tcp $HOME_NET any -> $EXTERNAL_NET [6851,6861] (msg:"Suspicious Client Outbound - Possible Hola VPN"; threshold: type limit, track by_src, seconds 60, count 1; classtype:policy-violation; sid:92405021; rev:1;)
This example rule has a threshold set so that any given client will only trigger it once per minute. This is a good safety measure so that the user does not get flooded with alerts if the matched traffic is particularly frequent.
It is a good idea to pick a unique high number sid, but our system will attempt to resolve any duplicates.
To add a custom rule like this to the sensor, follow these steps:
- Save the rule(s) to a text file on the local computer, one rule per line.
- Go to the Rules page for the sensor by clicking on "Rules" at the top of the page in the browser.
- Click on the "Merge Rules" button
- Browse to the rule file the user wants to upload, then click on "Submit Local Rules"
- Click save when prompted on the following pages.
- Reload the sensor.
This process will validate the new rule(s) and once the sensor is reloaded it should begin collecting alerts if any traffic matches.
Relevant Snort Rules Links
- The Snort documentation can be located at the following links.
http://www.snort.org/docs
http://www.snort.org/assets/125/snort_manual-2_8_5_1.pdf
http://www.snort.org/snort/faq/
| Previous Chapter | Next Chapter |
 1 (877) 664-7774 - support@metaflows.com
